


Price: $7.99
(as of Apr 08, 2025 11:55:29 UTC - Details)
The Best Way to Apply Press-On Nails: A Comprehensive Guide
Introduction
Are you tired of spending hours at the nail salon or struggling with messy nail polish? Press-on nails are a fantastic solution that combines convenience and style. In this article, we will explore the best way to apply press-on nails, ensuring you achieve a salon-quality look from the comfort of your own home. Whether you're new to press-on nails or looking to refine your technique, this guide is packed with practical tips and insights. We will cover everything from preparation to application and maintenance, all while making sure our content is easy to follow and understand.
Understanding Press-On Nails
What Are Press-On Nails?
Press-on nails are artificial nails that can be easily applied at home. They come in various shapes, sizes, and designs, making them a versatile option for anyone looking to enhance their manicure. Unlike traditional nail polish, which can chip or smudge, press-on nails offer instant glamour without the hassle.
Why Choose Press-On Nails?
One of the primary reasons people opt for press-on nails is their convenience. They are quick to apply, easy to remove, and can last for several days with proper care. Plus, they come in a range of designs, allowing you to switch up your look without the commitment of a salon visit.
Preparing Your Nails
Clean and Shape Your Natural Nails
Before applying press-on nails, it’s essential to prepare your natural nails. Start by removing any old nail polish and washing your hands thoroughly. Next, gently push back your cuticles and trim or file your nails to your desired shape. This step ensures the press-on nails adhere better and look more natural.
Buffing for Better Adhesion
Buffing your nails is another crucial step in preparation. Use a nail buffer to lightly roughen the surface of your natural nails. This process increases adhesion, helping your press-on nails stay in place longer. Just remember, you don’t want to over-buff—keep it gentle!
Choosing the Right Press-On Nails
Finding the Perfect Size
When it comes to press-on nails, size matters. Most press-on nail sets come with multiple sizes, so take the time to find the best fit for each finger. If needed, you can also file the edges of the nails to ensure a snug fit. A well-fitted press-on nail looks more natural and is less likely to pop off.
Selecting the Style You Love
With so many styles available, choosing the right design can be overwhelming. From classic French tips to vibrant patterns, pick a style that matches your personality and occasion. Whether you’re dressing up for a special event or just want to brighten up your everyday look, there’s a press-on nail set for you.
The Application Process
Apply a Base Coat
Before attaching your press-on nails, apply a thin layer of base coat to your natural nails. This step not only protects your nails but also helps the press-ons adhere better. Let the base coat dry completely before moving on to the next step.
Applying the Press-On Nails
Now for the fun part! Take a press-on nail and apply a small amount of nail glue to the back. For those using adhesive tabs, peel off the backing and place the tab on the nail. Position the press-on nail at the base of your natural nail and press down firmly for about 10 seconds. Repeat this process for all your nails, ensuring each one is securely attached.
Tips for a Flawless Finish
Avoiding Air Bubbles
One common mistake when applying press-on nails is trapping air bubbles underneath. To avoid this, press the nail down slowly, starting from the base and working your way to the tip. This technique ensures a smooth application without any pesky bubbles.
Sealing the Edges
Once all your press-on nails are applied, seal the edges with another layer of base coat or top coat. This step not only enhances the shine but also helps prevent lifting at the edges. A good seal is crucial for longer-lasting wear.
Maintaining Your Press-On Nails
Daily Care Tips
To ensure your press-on nails last as long as possible, treat them with care. Avoid using your nails as tools, and wear gloves when doing chores. Keeping your hands moisturized is also essential, but be careful not to get lotion on your nails, as it can weaken the adhesive.
Removing Press-On Nails Safely
When it’s time to remove your press-on nails, do it gently. Soak your nails in warm, soapy water for about 10-15 minutes to loosen the adhesive. Then, gently push the nails off starting from the sides. If you encounter resistance, re-soak your nails. Avoid pulling or yanking, as this can damage your natural nails.
Troubleshooting Common Issues
What to Do If a Nail Pops Off
It can be frustrating if a press-on nail pops off unexpectedly. If this happens, don’t panic! Simply clean the nail and your natural nail, reapply a small amount of glue or adhesive, and press it back on. With proper care, you can extend the wear of your press-on nails.
Handling Chipped or Damaged Press-Ons
If you notice any chips or damage to your press-on nails, you have a couple of options. You can either file the nail down to minimize the appearance of the chip or replace the nail altogether. Keeping a few extra nails on hand can be handy for quick fixes.
Conclusion
In conclusion, applying press-on nails is a simple and rewarding process that allows you to achieve a beautiful manicure in no time. From preparation to application and maintenance, following the right steps ensures that your press-on nails look fantastic and last longer. Remember to choose the right size and style, and don’t forget to care for your nails daily. Now that you know the best way to apply press-on nails, you can enjoy salon-quality nails without the hassle. Embrace the convenience of press-on nails and showcase your unique style with confidence!
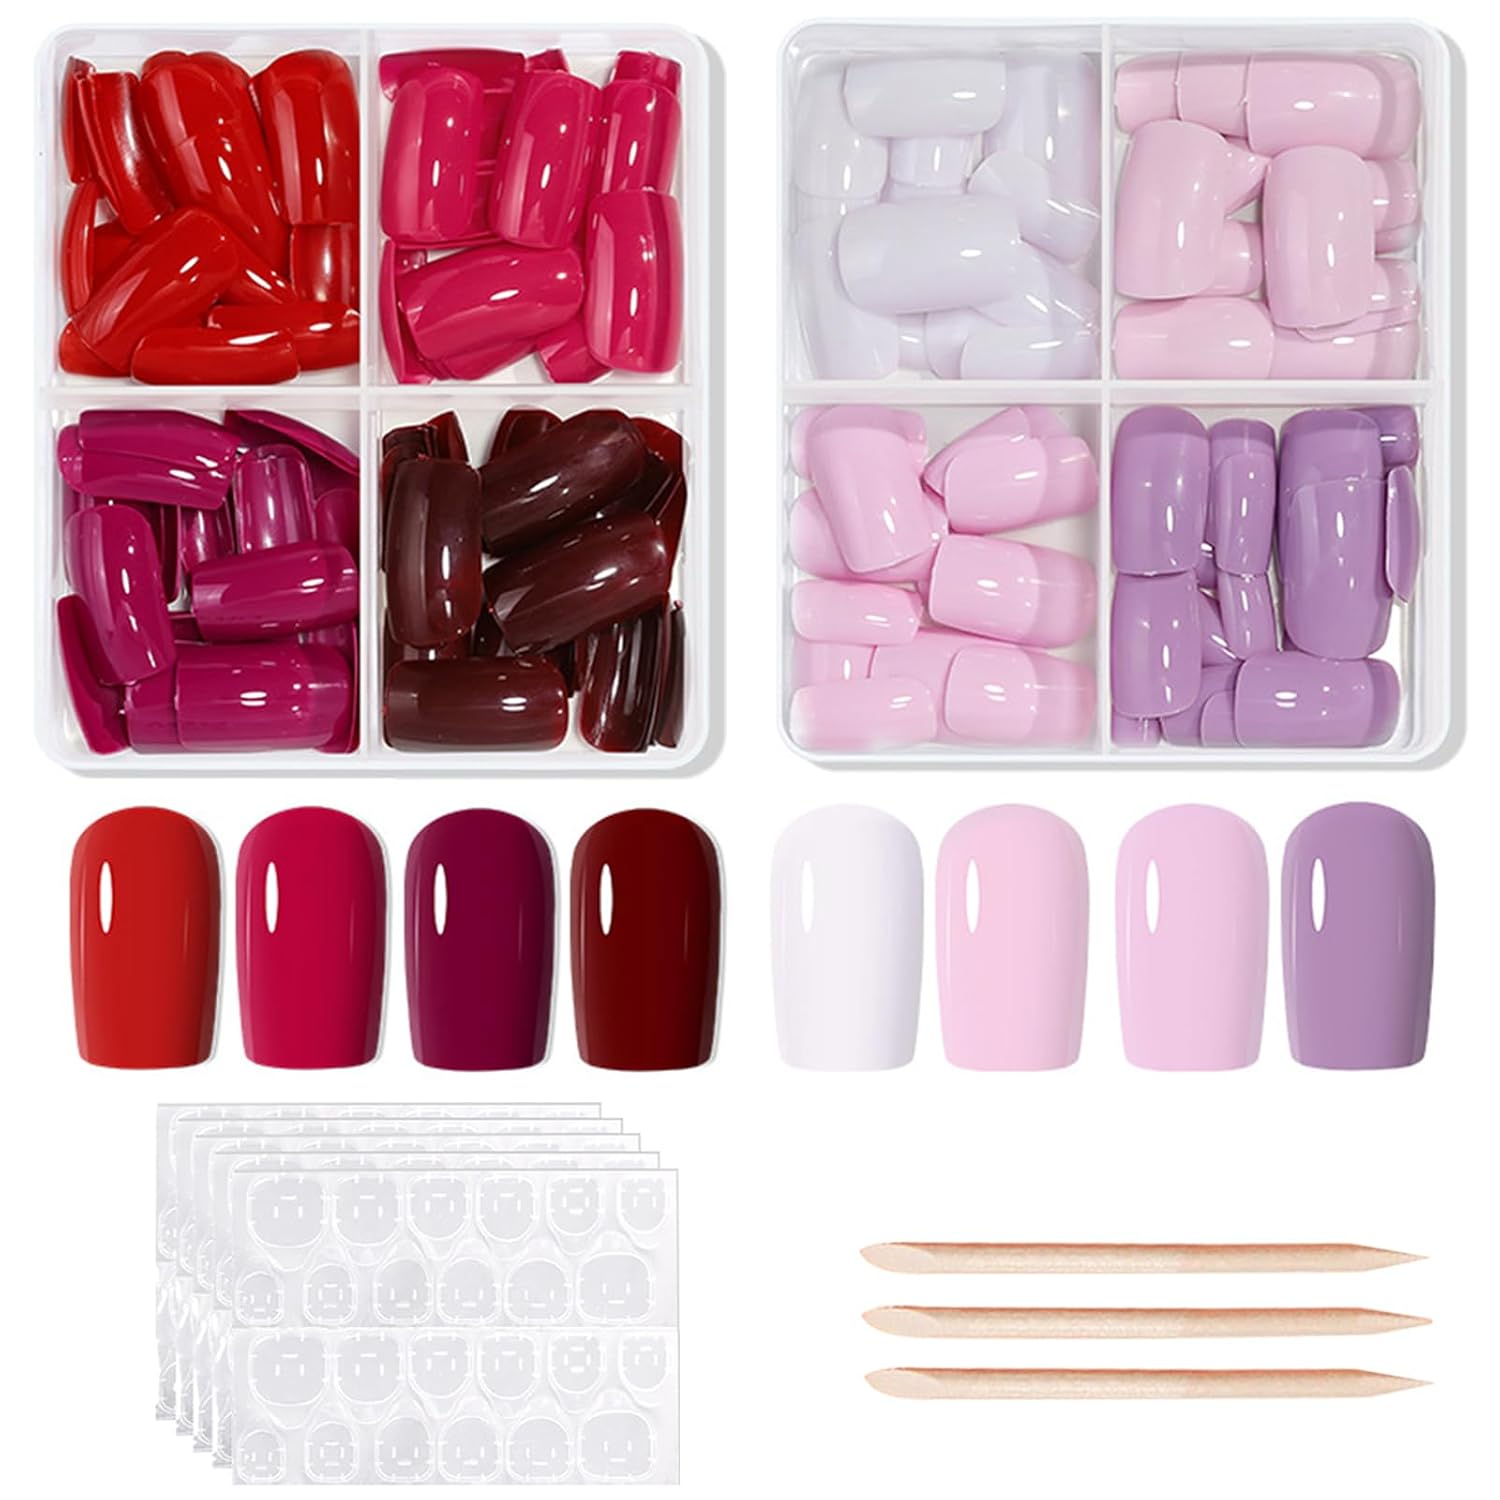
🎁 Complete Press On Nails Kit: This press on nails kit includes 192 short square press on nails in 8 vibrant colors, including stylish red press on nails for a bold statement. It also comes with 120 jelly adhesive tabs and essential tools like wooden cuticle sticks. Perfect for beginners and DIY nail art lovers who want an easy and stylish manicure.
💅 Trendy Short Glossy Nails: Featuring 192 pre-numbered press on nails short square from size NO.0 to NO.9, these square press on nails offer a sleek, vibrant look that complements any style. The press on design elongates nail beds and enhances finger appearance effortlessly.
✨ Natural & Versatile Design: These press on nails short fit naturally and are crafted in a convenient short square press on nails shape. The set includes 8 versatile colors, from classic to glittery, offering endless styling possibilities for any occasion, from everyday wear to special events.
💖 Durable & Safe Material: Made from high-quality ABS, these press on nail options are flexible at the base for comfort and solid at the tips for durability. Apply a top coat and cure with a UV lamp for a long-lasting, glossy finish, ensuring your red nails and other shades stay flawless.
🛠 Easy Application & Removal: Achieve salon-quality nails at home in minutes! These press on nails are easy to apply and remove, saving time and money. Change your look as often as you like without damaging your natural nails, making this press on nails kit a must-have for quick and stylish manicures.